
Battles - The Battle of the Somme, 1916
 Comprising the main Allied attack on the Western Front during 1916, the Battle of the
Somme is famous chiefly on account of the loss of 58,000 British troops (one
third of them killed) on the first day of the battle, 1 July 1916, which to
this day remains a one-day record. The attack was launched upon a 30
kilometre front, from north of the Somme river between Arras and Albert, and
ran from 1 July until 18 November, at which point it was called off.
Comprising the main Allied attack on the Western Front during 1916, the Battle of the
Somme is famous chiefly on account of the loss of 58,000 British troops (one
third of them killed) on the first day of the battle, 1 July 1916, which to
this day remains a one-day record. The attack was launched upon a 30
kilometre front, from north of the Somme river between Arras and Albert, and
ran from 1 July until 18 November, at which point it was called off.
The offensive was planned late in 1915 and was intended as a joint French-British attack. The French Commander in Chief, Joffre, conceived the idea as a battle of attrition, the aim being to drain the German forces of reserves, although territorial gain was a secondary aim.
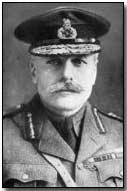
The plan was agreed upon by the new British Commander in Chief, Sir Douglas Haig, although Haig would have preferred an offensive among the open ground of Flanders. Haig, who took up his appointment as Commander in Chief of the BEF on 19 December 1915, had been granted authorisation by the British government, led by Asquith, to conduct a major offensive in 1916.
 Although in
actuality British forces comprised by far the bulk of the offensive forces,
Joffre and Haig originally intended for the attack to be a predominantly
French offensive. However the German onslaught at
Verdun at the start of
1916, where the German Army Chief of Staff,
von Falkenhayn promised
to 'bleed France white', resulted in the diversion of virtually all French
manpower and efforts.
Although in
actuality British forces comprised by far the bulk of the offensive forces,
Joffre and Haig originally intended for the attack to be a predominantly
French offensive. However the German onslaught at
Verdun at the start of
1916, where the German Army Chief of Staff,
von Falkenhayn promised
to 'bleed France white', resulted in the diversion of virtually all French
manpower and efforts.
The German Verdun offensive transformed the intent of the Somme attack; the French demanded that the planned date of the attack, 1 August 1916, be brought forward to 1 July, the aim chiefly being to divert German resources from Verdun in the defence of the Somme.
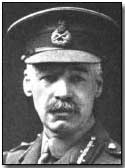
Haig took over responsibility from Joffre for the planning and execution of the attack. Haig meticulous preparations progressed slowly, much to Joffre's irritation. Haig intended to fashion the attack using the ideas of both himself and General Rawlinson, whose Fourth army was to spearhead the assault.
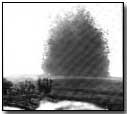
 The attack
was preceded by an eight-day
preliminary bombardment of the German lines,
beginning on Saturday 24 June.
The attack
was preceded by an eight-day
preliminary bombardment of the German lines,
beginning on Saturday 24 June.
The expectation was that the ferocity of the bombardment would entirely destroy all forward German defences, enabling the attacking British troops to practically walk across No Man's Land and take possession of the German front lines from the battered and dazed German troops. 1,500 British guns, together with a similar number of French guns, were employed in the bombardment.
Following the artillery bombardment, it was determined that a creeping barrage would precede the advancing infantry to the German front line, and onwards to the second and third trench lines. The Royal Artillery had prepared an underground network of telephone cables so as to enable forward observation officers to monitor and correct the barrage as the battle progressed.
With the conclusion of the advance bombardment Rawlinson's southern wing, at the centre of the attack line, was instructed by Haig to consolidate after a limited advance. Rawlinson's troops went into battle heavily-laden with supplies for that purpose. Meanwhile to the north the rest of Fourth Army, in addition to 1 Corps of General Allenby's Third Army, attempted a complete breakthrough, with cavalry standing by to fully exploit the resultant gap in the German lines.
Haig's background in cavalry - he served in the 7th (Queen's Own) Hussars - convinced him that the coup de grace of the attack would best be carried out by cavalry troops. Following the taking of the German lines, the plan was for the British to break through to Cambrai and Douai, thus breaking the German line in two.
Further south a subsidiary advance by the French Sixth Army was scheduled to start operations at the same time as 1 Corps.
27 divisions of men went into the attack - 750,000 men - of which over 80% were comprised from the British Expeditionary Force (BEF). Ranged against them in the German trenches were 16 divisions of the German Second Army. The odds were apparently stacked heavily in the attacking force's favour.
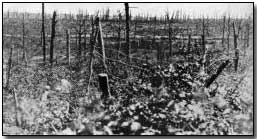
However the advance artillery bombardment failed to destroy either the German front line barbed wire or the heavily-built concrete bunkers the Germans had carefully and robustly constructed. Much of the munitions used by the British proved to be 'duds' - badly constructed and ineffective. Many charges did not go off; even today farmers of the Western Front unearth many tons of unexploded 'iron harvest' each year.
During the bombardment the German troops sought effective shelter in such bunkers, emerging only with the ceasing of the British artillery bombardment, when the German machine guns were manned to great effect.
 The attack
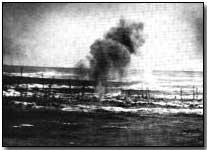
itself began at 07:30 on 1 July with the detonation of a series of 17
mines. The first, which was actually exploded ten minutes early, went off
at 07:20.
The attack
itself began at 07:30 on 1 July with the detonation of a series of 17
mines. The first, which was actually exploded ten minutes early, went off
at 07:20.
The detonation of this mine, the Hawthorn Crater - which remains visible today - was captured on moving film by official war photographer Geoffrey Malins.
Click here for footage taken by Malins on 1 July 1916.
The first attacking wave of the offensive went over the top from Gommecourt to the French left flank just south of Montauban. The attack was by no means a surprise to the German forces. Quite aside from being freely discussed in French coffee shops and in letters home from the front, the chief effect of the eight-day preliminary bombardment served merely to alert the German army to imminent attack.
As a consequence of the lack of surprise generated by the advance bombardment, and the lack of success in cutting the German barbed wire and in damaging their underground bunkers, the BEF made strikingly little progress on 1 July or in the days and weeks that followed.
More success was achieved by the French forces at the southern tail of the line, possibly because their advance bombardment was sprung only hours before the attack, thus ensuring a degree of surprise. In addition, von Falkenhayn believed that the French would not attack at all on account of their heavy losses at Verdun. By advancing in small groups, as they had at Verdun, the French troops achieved most of their objectives. Even so, the gains made here were consolidated upon rather than exploited.
 The
British troops were for the most part forced back into their trenches by the
effectiveness of the German machine gun response.
The
British troops were for the most part forced back into their trenches by the
effectiveness of the German machine gun response.
Many troops were killed or wounded the moment they stepped out of the front lines into No Man's Land. Many men walked slowly towards the German lines, laden down with supplies, expecting little or no opposition. They made for incredulously easy targets for the German machine-gunners.
Despite heavy losses during the first day - 58,000 British troops alone - Haig persisted with the offensive in the following days. Advances were made, but these were limited and often ultimately repulsed. Rawlinson's forces secured the first line of German trenches on 11 July. On that day German troops were transferred from Verdun to contribute to the German defence, doubling the number of men available for the defence.
On 19 July the German defence was re-organised, with the southern wing forming a new army, First Army, under von Gallwitz. Gallwitz took overall responsibility for the conduct of the defence of the line.
Haig was convinced - as were the Germans - that the enemy was on the point of exhaustion and that a breakthrough was imminent. Thus the offensive was maintained throughout the summer and into November. The British saw few victories however: such as Pozieres, captured by two Australian divisions on 23 July; and those that were secured were not followed up.
 In early
September the French Tenth Army under
Micheler joined the attack on a 20
kilometre front to the south. Meanwhile the British attack was renewed in
north-east, the Battle of Flers-Courcelette, by the Fourth Army on 15
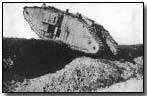
September. This latter attack made use of
tanks for the first time and
deployed 15 divisions of men; even so, it gained under a kilometre of
ground.
In early
September the French Tenth Army under
Micheler joined the attack on a 20
kilometre front to the south. Meanwhile the British attack was renewed in
north-east, the Battle of Flers-Courcelette, by the Fourth Army on 15
September. This latter attack made use of
tanks for the first time and
deployed 15 divisions of men; even so, it gained under a kilometre of
ground.
These first tanks, which totalled 50, were sourced from the Machine Gun Corps, 'C and 'D' Companies, and reached the Somme in September. Mechanical and other failures reduced the original number of participating tanks from 50 to 24. Whilst they achieved a large measure of shocked surprise when sprung upon the German opposition, these early tanks proved unwieldy and highly unreliable.
 The tanks
were rolled out at 06:20 on the morning of 15 September.
General Gough's
forces moved to force the enemy off the northern end of the main ridge and
away from Fourth Army.
The tanks
were rolled out at 06:20 on the morning of 15 September.
General Gough's
forces moved to force the enemy off the northern end of the main ridge and
away from Fourth Army.
Rawlinson's troops were to break through the remaining enemy trench system while the French Sixth Army would attempt to clear the enemy from the British right flank. Meanwhile the Canadians were northwest of the Albert-Bapaume road and outpaced their seven tanks to capture Courcelette. Immediately south of them, the 15th Scottish Division, helped by a single tank, captured Martinpuich.
To the southeast, however, German forces in High Wood swept the ground with fire from each end, halting a number of tanks. Others found themselves lost, while yet others fired on their own infantry.
To the east progress to Flers was helped by the arrival of four tanks at a critical moment, the ruined village falling to a single tank assisted by mixed platoons of Hampshires and Royal West Kents.
Haig renewed attacks in this area again between 25-27 September, in the Battle of Morval and the Battle of Thiepval Ridge). British advances were small but were consolidated upon. Other attacks were launched by the British at the Battles of Transloy Ridges (1-20 October) and the Battle of the Ancre Heights (1-11 October). Similarly French attacks were continued in the south around Chaulnes, and in the centre east of Morval.
In October Joffre urged Haig to continue the offensive. By this time the French forces in Verdun were on the offensive and were gaining ground. Joffre was concerned that Haig should keep up the pressure on the Germans so as to prevent a diversion of German manpower back to Verdun to assist with the German defence there.
On 13 November the BEF made a final effort on the far east of the salient in the Battle of the Ancre, in which they captured the field fortress of Beaumont Hamel.
Despite the slow but progressive British advance, poor weather - snow - brought a halt to the Somme offensive on 18 November. During the attack the British and French had gained 12 kilometres of ground, the taking of which resulted in 420,000 estimated British casualties, including many of the volunteer 'pal's' battalions, plus a further 200,000 French casualties. German casualties were estimated to run at around 500,000.
Sir Douglas Haig's conduct of the battle caused - and still causes - great controversy. Critics argued that his inflexible approach merely repeated flawed tactics; others argue that Haig's hand was forced in that the Somme offensive was necessary in order to relieve the French at Verdun.
Click here to view a map detailing the progress of the battle.
.jpg)
Photographs courtesy of Photos of the Great War website
Click here to read Sir Douglas Haig's Somme despatch. Click here to read an account of the offensive by official British reporter Philip Gibbs. Click here to read a report written by local German commander Crown Prince Rupprecht. Click here to read the official Germany account of the offensive written by General von Steinacker.
Click here to read Alfred Dambitsch's Somme memoirs; click here to read Alfred Ball's memoirs.
The Western Front Today: Hawthorn Crater
The Western Front Today: Sunken Lane
The Western Front Today: Albert
The Western Front Today: Lochnagar
The Western Front Today: Thiepval Memorial
"Toc Emmas" was slang for trench mortars.
- Did you know?