
Battles - The Gallipoli Front - An Overview
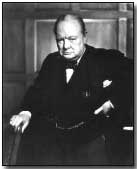
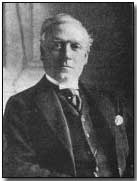
 Winston
Churchill is widely credited as the man who committed British, French
and - above all - untested Australian and New Zealand forces to the ill-fated
campaign to seize control of the Dardanelles Straits and western Turkey.
Indeed, although it was Churchill's drive and aggressiveness - not to
mention cunning - which resulted in the campaign actually taking place, the
notion of capturing the Turkish Dardanelles Straits had long been given
consideration.
Winston
Churchill is widely credited as the man who committed British, French
and - above all - untested Australian and New Zealand forces to the ill-fated
campaign to seize control of the Dardanelles Straits and western Turkey.
Indeed, although it was Churchill's drive and aggressiveness - not to
mention cunning - which resulted in the campaign actually taking place, the
notion of capturing the Turkish Dardanelles Straits had long been given
consideration.
It was widely believed however - at least in professional circles - that a purely naval attempt to win the Straits was bound to end in failure.
The Value of the Straits
But why attempt the Straits in the first place? The answer lay in the great strategic value control would give the Entente Powers. The Straits linked the Mediterranean Sea with the Sea of Marmora. This not only gave ready access to the Turkish capital Constantinople and much of the Turkish Empire's industrial powerhouse, but also provided a lane to the Black Sea.
Just as importantly, if not more so, access to the Sea of Marmora was bound to give Britain and France supply route access to their eastern ally, Russia. Therefore it was quite feasible that should Britain and France gain the Straits they could succeed in not only eliminating Turkey from the war, but in also drawing Greece and Bulgaria into the war against the Central Powers.
The Difficulty in Seizing Control
 Control
of the Dardanelles Straits was therefore a prized ambition of the Entente
Powers. As might be expected given the huge tactical and strategic
value placed upon the Straits, they were however heavily defended, chiefly by
natural geography.
Control
of the Dardanelles Straits was therefore a prized ambition of the Entente
Powers. As might be expected given the huge tactical and strategic
value placed upon the Straits, they were however heavily defended, chiefly by
natural geography.
To the north they were protected by the Gallipoli Peninsula; to the south by the shore of Ottoman Asia. In addition, fortresses were well positioned on cliff-tops overlooking shipping lanes.
Potential Greek Support
It seemed obvious to the Entente Powers - chiefly Britain - that no attempt upon the Straits could be considered without the requirement for support from ground troops. The Greek government led by Eleutherios Venizelos was of the same opinion. As soon as the First World War was underway Greece approached Britain and offered to provide some 60,000 troops to assist in a combined land operation, the whole to be aided by old battleships as necessary.
 However
both British and French governments - in this case in the form of British
Foreign Secretary
Sir Edward Grey - were initially opposed to any form of action.
However
both British and French governments - in this case in the form of British
Foreign Secretary
Sir Edward Grey - were initially opposed to any form of action.
Grey retained hopes of bringing Turkey - at that stage still a neutral power - into the war on the side of the Entente Powers, in spite of mounting evidence of increasing (and well established) German influence in Constantinople.
In the event Turkey finally entered the war by siding with Germany and Austria-Hungary in late October 1914. By this time Venizelos's government in Greece had fallen and the latter's previous offer of assistance was qualified by a requirement for additional Bulgarian support - which was not forthcoming.
Lack of Success on the Western Front
In the meantime both Britain and France were finding news from the campaign on the Western Front sober reading. While much of their time, effort and resources were consumed by the requirements of the struggle in France and Flanders both governments gradually came around to the notion of opening up another front in the Mediterranean, one that offered possibly better prospects of success.
 In
Britain in particular a number of members of the War Cabinet had long
favoured decisive action away from the stagnation of the Western Front's
lines of trench warfare.
In
Britain in particular a number of members of the War Cabinet had long
favoured decisive action away from the stagnation of the Western Front's
lines of trench warfare.
Such "Easterners" - which included future Prime Minister David Lloyd George - embraced a plan put forward by Churchill in January 1915 to attempt a naval capture of the Straits.
Churchill took great care in placing such a proposal to the Cabinet. He coerced Admiral Sir Sackville Carden - the commander of British naval forces in the Mediterranean - into sending him a detailed plan for a solely naval attack upon the Straits. Carden obliged but was by no means personally in favour of such an approach.
Nevertheless Churchill placed Carden's plans - which were sufficiently detailed to gain credence - to his War Cabinet colleagues on 13 January 1915. At this time the War Cabinet was somewhat despondent by the patent lack of success in France and Flanders, and further dismayed by a call by the Russian Commander-in-Chief Grand Duke Nikolai for radical action to offset pressure in the Caucasus.
 Thus
Churchill received from
Herbert Asquith's
War Cabinet general agreement that action in the Dardanelles be given active
consideration.
Thus
Churchill received from
Herbert Asquith's
War Cabinet general agreement that action in the Dardanelles be given active
consideration.
Notwithstanding an obvious desire to initiate any plan likely to bring with it a possibility of success, Admiral John Fisher's silence at the War Cabinet meeting was remarkable. As First Sea Lord his naval force was to take prime responsibility in driving forward Churchill's strategy.
Given his later violent objections - which ultimately led to his (and Churchill's) resignation - his lack of objection in January was all the more surprising. It is possible however that he envisaged any eventual attack taking the form of a combined naval/ground troop undertaking.
Political Approval for a Naval Offensive
Churchill however came away from the Cabinet meeting believing that he had been given the authority to place Carden's blueprint into effect. In doing so he planned to make use of 'spare', aged battleships (thus raising Fisher's hackles).
He set a date of 19 February for implementation of a first attack, plans which were formally approved by the War Cabinet on 28 January. Churchill's ambitious approach was however questioned by those who believed that it remained unclear in terms of strategy in the event of an immediate decisive breakthrough.
 So
much for British political opinion. In Paris the government remained
enmeshed in affairs on the Western Front and was somewhat less inclined
to wholeheartedly support any British-sponsored expedition to the
Dardanelles.
So
much for British political opinion. In Paris the government remained
enmeshed in affairs on the Western Front and was somewhat less inclined
to wholeheartedly support any British-sponsored expedition to the
Dardanelles.
Nevertheless the incoming French naval minister Jean Augagneur took a political gamble when he effectively disregarded the opinion of his professional advisers in backing the British plan. To some extent this was driven by a decided unwillingness to cede the possibility of a notable breakthrough to the British alone: the French navy needs must share in any potential naval glory. A French squadron was consequently added to the February operation.
Dissension Within the Royal Navy
By this time Admiral Fisher was growing thoroughly alarmed at the prospect that 'spare' shipping be drawn away from his beloved Grand Fleet - a threat in being in the North Sea - for what he regarded as a highly dubious undertaking in the Mediterranean. His former close relations with Churchill - who had brought him out of distinguished retirement in October 1914 to his former post of First Sea Lord - began to chill.
 However
Fisher's growing reservations were largely ignored by British war minister
Lord Kitchener.
On 16 February 1915 Kitchener issued orders to ensure the readiness of
Britain's sole available infantry division to assist with operations as
necessary.
However
Fisher's growing reservations were largely ignored by British war minister
Lord Kitchener.
On 16 February 1915 Kitchener issued orders to ensure the readiness of
Britain's sole available infantry division to assist with operations as
necessary.
He further specified that Australian and New Zealand forces stationed in Egypt en route for France should be made available if required. On 18 February the French government similarly added a corps of men to the endeavour, although they arrived too late to be used the following day.
Initial Attacks - 19/25 February 1915
The first attempt upon the 65km-long, 7km-wide Straits was made on 19 February 1915 by a considerable number of combined British and French battleships comprised of the new battleship Queen Elizabeth, 3 battlecruisers, 16 pre-dreadnought (including four French vessels), 4 cruisers, 18 destroyers, 6 submarines, 21 trawlers plus the seaplane carrier Ark Royal. Overseeing the effort was Carden.
Pounding the outer fortresses the British and French attack proved ineffective in the face of an efficient Turkish defensive system and poor Allied gunnery, although greater damage was inflicted than the bombarding naval forces realised.
A renewed bombardment the following week (following a pause for adverse weather), on 25 February, was similarly unsuccessful. While the outer forts were themselves seized the Allied force could not effective silence the Turkish mobile batteries that poured shellfire from the heights.
Failure to Force the Narrows, 18 March 1915
Having paused to consolidate following the clear failure of February's attempts to batter the Turkish protective fortresses, a further naval effort was briefly launched on 18 March in an attempt to force through The Narrows (so-named because just 1,600 heavily-mined metres separated the shore on either side).
Immediately before the attack's launch however Carden collapsed from nervous exhaustion. He was replaced by Sir John de Robeck. The renewed attack proved a heavy failure, chiefly on account of the presence of an unsuspected Turkish minefield.
 It
was increasingly clear that ground support was required. A month's
pause in operations was undertaken pending preparations for Allied landings at
Helles and Anzac Cove.
It
was increasingly clear that ground support was required. A month's
pause in operations was undertaken pending preparations for Allied landings at
Helles and Anzac Cove.
Some 18,000 French colonial troops were despatched to the region on 10 March - prior to the attempt on The Narrows - and on 12 March Lord Kitchener appointed Ian Hamilton (a former protégé) as regional Commander-in-Chief responsible henceforth for the success of the expedition, accompanied by a force of 75,000 comprised largely of untested Australian and New Zealand troops.
Preparations for a Ground Offensive
Hamilton, unsure of the appropriate strategy, sought advice from de Robeck and agreed on 27 March to a straightforward invasion of the Gallipoli Peninsula.
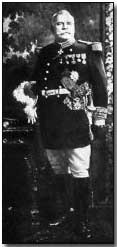
Preparations for the Allied landings were not auspicious, and were distinguished by hesitation, indecision and confusion. Meanwhile Turkish defences were further boosted by the arrival of ground forces around the Straits. As a measure of the extent of German influence over Turkish policy regional command was placed in the hands of Liman von Sanders.
Liman brought with him approximately 84,000 troops which he dispersed to strategic locations around Gallipoli. As it transpired however Liman's careful positioning of his men was found wanting once Hamilton actually launched his attack on the southern peninsula: Hamilton chose to attack where the Turkish concentration was as its weakest.
Landings at Helles and Anzac Cove, 25 April 1915
 The
landings were initiated on 25 April 1915 but were largely mismanaged. But
for the relative weakness of Turkish strength on the southern peninsula the
whole operation might well have been thrown back into the sea.
The
landings were initiated on 25 April 1915 but were largely mismanaged. But
for the relative weakness of Turkish strength on the southern peninsula the
whole operation might well have been thrown back into the sea.
As it was heavy casualties were incurred at those locations where Turkish defenders were available in any force. Even so two beachheads were established by Hamilton's force, at Helles on Gallipoli's southernmost tip (led by Sir Aylmer Hunter-Weston), and further up the coast near Gaba Tepe - the latter soon to be renamed Anzac Cove in honour of the Australian and New Zealand corps who bore the brunt of operations in the area (led by the rather more competent Sir William Birdwood).
Three Failed Attacks at Krithia, 28 April-4 June 1915
Having established two beachheads at great cost Hamilton determined to extend the Allied position in the south, with attacks directed towards Krithia. Unduly optimistic in its aims three successive operations were launched upon Krithia by Hunter-Weston in April, May and June 1915: all were thrown back by Liman's increasingly effective Turkish defence force.
Meanwhile British First Sea Lord Admiral Fisher's dramatic resignation on 15 May 1915 over Churchill's handling of the Gallipoli campaign led to the latter's own downfall as Churchill too resigned, his wartime political career apparently effectively over. Churchill had earlier, on 23 March, reluctantly admitted the failure of the purely naval bombardment to the War Cabinet, denting his already frail political credibility.
Landings at Suvla Bay, 6 August 1915
It was clear that operations in Gallipoli were going badly. The newly formed Dardanelles Committee in London met on 7 June to consider what steps next to take. Agreement was reached to send additional forces to Hamilton, greatly reinforcing the Allied presence on the peninsula by some three divisions - a decision made by Kitchener in the face of fierce opposition from hard-pressed commanders on the Western Front.
 Unfortunately
for the Allies their Turkish opponents were bringing forward additional
reserves at a greater pace than they themselves could
manage, with forces despatched from both Palestine and Caucasian Fronts.
Unfortunately
for the Allies their Turkish opponents were bringing forward additional
reserves at a greater pace than they themselves could
manage, with forces despatched from both Palestine and Caucasian Fronts.
Such an injection of additional Allied resources signalled another major offensive. When put into effect on 6 August 1915 it took the form of a three-pronged attack: a diversionary action at Helles; movement northwards from Anzac Cove towards Sari Bair; and the centrepiece of the offensive, a landing in force at Suvla Bay by freshly arrived divisions operating under General Sir Frederick Stopford. The idea was for Stopford's forces to link with the troops at Anzac Cove and make a clean sweep across the Gallipoli peninsula.
In the interim Hunter-Weston pressed on with further attacks directed towards Achi Baba in Helles. These were uniformly unsuccessful, maintaining Hunter-Weston's particular record of poor results since arriving on the peninsula.
To Hamilton's credit the landings at Suvla Bay achieved total surprise and Stopford made initial progress unopposed. However the wider offensive rapidly lost momentum by 10 August as local command indecision - Stopford was particularly at fault - and lack of firm decision from Hamilton's headquarters took their melancholy toll, although fighting continued at Sari Bair until 12 August.
Three Indefensible Beachheads: A Move South
Hamilton's position was an unenviable one. He had command of three beachheads - at Helles, Anzac Cove and Suvla Bay - but each was overlooked by high ground commanded by Turkish forces. Progress was therefore not only infeasible, but his forces found themselves under more or less constant heavy fire.
 Hamilton
- by now rapidly losing credibility among local commanders and - worse -
among his troops - determined to try and make a break south from Suvla Bay
to link up with Anzac Cove, a distance of some 5km.
Hamilton
- by now rapidly losing credibility among local commanders and - worse -
among his troops - determined to try and make a break south from Suvla Bay
to link up with Anzac Cove, a distance of some 5km.
Consequently he provided additional resources to Suvla Bay, including a new set of commanders to replace the discredited structure already in place.
In spite of additional men and materials Hamilton's attacks against Hill 60 and Scimitar Hill in August 1915 came to nought. With Allied casualties running at around 40,000 an especially uncomfortable form of trench warfare settled in, a disastrous state of affairs for the Allied forces.
Hamilton, feeling the pressure, requested a further 95,000 reinforcements from Kitchener in London. He was offered barely a quarter, 25,000. Confidence in the operation in London and Paris was dwindling. Nevertheless Churchill pressed both governments to provide continued support. French General Maurice Sarrail suggested a combined offensive against the Asian coast, a proposal rapidly over-turned by his Commander-in-Chief Joseph Joffre, who insisted upon retaining French focus on the Western Front.
Salonika
 Affairs
outside of Gallipoli began to intrude upon strategy in the region. The
invasion of Serbia and plans for an extensive landing at Salonika exhausted
resources from both French and British governments, with the latter offering
to provide up to 125,000 troops (much against Kitchener's inclination).
Affairs
outside of Gallipoli began to intrude upon strategy in the region. The
invasion of Serbia and plans for an extensive landing at Salonika exhausted
resources from both French and British governments, with the latter offering
to provide up to 125,000 troops (much against Kitchener's inclination).
Such were the demands for men intended for Salonika that forces were diverted away from Hamilton in Gallipoli, to the latter's great dismay. As it was Hamilton was facing increasing criticism from London as grim news of the expedition reached home, along with complaints of his mismanagement of the campaign (from the Australian journalist Keith Murdoch among others).
Evacuation
Thus with the possibility of further reinforcements to the region seemingly ruled out, Hamilton received word on 11 October 1915 of a proposal to evacuate the peninsula. He responded in anger by estimating that casualties of such an evacuation would run at up to 50%: a startlingly high figure.
The tide was clearly moving against Hamilton. His belief in what was widely viewed as an unacceptable casualty rate in the event of evacuation resulted in his removal as Commander-in-Chief and recall to London at a meeting of the Dardanelles Committee on 14 October.
Hamilton was replaced by Sir Charles Monro. Monro lost no time in touring Helles, Suvla Bay and Anzac Cove upon his arrival on the peninsula on 28 October. His recommendation was prompt: evacuation. This did not however meet with Kitchener's approval. He travelled to the region to see the state of affairs for himself.
 Upon
his arrival however
he quickly reversed his thinking upon seeing the conditions facing the
Allied force and recommended evacuation on 15 November 1915,
overriding arguments by senior naval figures
Sir Roger Keyes
and Rosslyn Wemyss
to attempt a naval seizure once again.
Upon
his arrival however
he quickly reversed his thinking upon seeing the conditions facing the
Allied force and recommended evacuation on 15 November 1915,
overriding arguments by senior naval figures
Sir Roger Keyes
and Rosslyn Wemyss
to attempt a naval seizure once again.
The British government, having prevaricated for several weeks, finally sanctioned an evacuation on 7 December. Unfortunately by this stage a heavy blizzard had set in making such an operation hazardous. Nevertheless the evacuation of 105,000 men and 300 guns from Anzac Cove and Suvla Bay was successfully conducted from 10-20 December 1915. The evacuation of Helles was conducted - comprising 35,000 men - from late December until 9 January 1916.
The evacuation operation was easily the most successful element of the entire campaign, with casualty figures significantly lower than Hamilton had predicted (official figures quote just three casualties). Painstaking efforts had been made to deceive the 100,000 watching Turkish troops into believing that the movement of Allied forces did not constitute a withdrawal.
Winston Churchill however viewed Monro's achievement with a somewhat jaundiced eye: "he came, he saw, he capitulated" he wrote of Monro, and the sneer has remained through the years to blight Monro's correct decision and remarkable follow-through.
Campaign Summary
Some 480,000 Allied troops had been dedicated to the failed campaign. British casualties (including imperial forces) amounted to approximately 205,000. French losses were estimated at around 47,000. Turkey incurred around 250,000 casualties.
The subsequent Dardanelles Commission established to investigate the expedition's failure produced its final report in 1919; its conclusions were regarded as insipid with no figures (political or military) heavily censured.
To view maps detailing the progress of the Gallipoli campaign click here; and here; and here; and here.
.jpg)
.jpg)
.jpg)
.jpg)
Click here to read a journalist's account of a return visit to the Gallipoli peninsula following its surrender to the Allies, on 9 November 1918.
| Date | Event |
|---|---|
| 19/25 February 1915 | First & Second Allied naval bombardment |
| 18 March 1915 | Allied naval attempt to force The Narrows |
| 25 April 1915 | Allied landings at Helles and Anzac Cove |
| 28 April-4 June 1915 | First, Second and Third Battles of Krithia |
| 6 August 1915 | Allied landings at Suvla Bay |
| 10-20 December 1915 | Allied evacuation of Anzac Cove and Suvla Bay |
| 9 January 1916 | Completion of evacuation of Helles |
Photographs courtesy of Photos of the Great War website
"Harry Tate" was the nickname given by British pilots to the R.E.8 aircraft
- Did you know?